


After seeing a ton of DIY playhouse makeovers on Pinterest, I decided it was finally time to tackle one for my three-year old since we’re staying home a lot more these days and I can’t turn down a crafting challenge. While summer has come to an end, there’s still plenty of nice weather to work outside on your own DIY makeover. Plus, people may be looking to purge playhouses as they prepare for winter, so it’s a great time to search for a used one for sale. There’s still lots of time for your kiddo to get some enjoyment out of it into the fall, plus they are a great addition to a finished basement or indoor play space if you have the room.
I scored my DIY playhouse on Facebook Marketplace for cheap by setting up an alert every time one was posted. This may have been the hardest part of the whole thing! They would get posted and swooped up within minutes; apparently I was not the only one with this idea this summer. But if you’re lucky enough to score one, I’ll walk you through how I completed my makeover step by step.


Steps for Completing the Playhouse Makeover
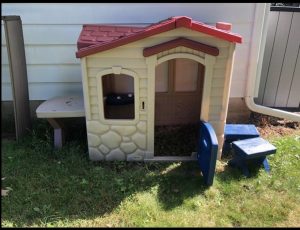
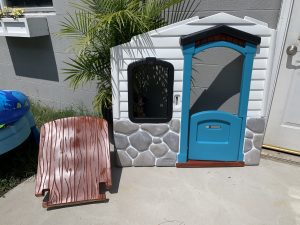
First and foremost, you have to decide what you want it to be and choose your color palette. I thought it would be fun to turn it into something other than a house. My son loves to play with his cash register, and he loves “serving” things to anyone who will accept them. We came up with the idea of a DIY ice cream shop because who doesn’t love ice cream?? Plus I knew it would be really fun to incorporate colors and fun accessories to turn it into a shop. Would I have picked a partially stone house with a fireplace inside to turn into an ice cream shop? Nope, but we worked with what we had!
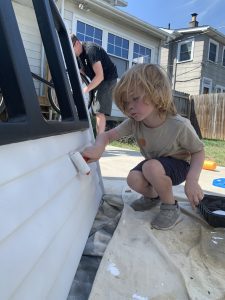
After settling on the theme, it was time to get to work. It was fully disassembled from when we picked it up, and while the sellers were kind enough to power wash it, I needed to really put in some elbow grease and scrub it to make sure it was as clean as possible so that the paint would stick. I used dish soap and a rag and scrubbed each section, spraying off with a hose after and letting it air dry.
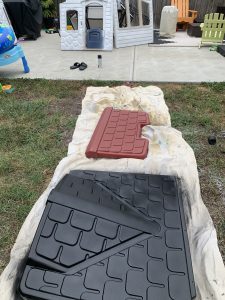
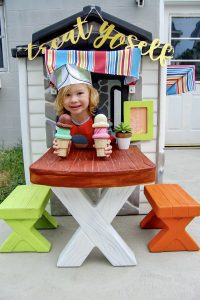
Now onto the fun part – painting! Be prepared to use a lot of spray paint! I probably used at least 12 cans. Obviously the colors are up to you, but I decided to go with white siding, gray stones, and a black roof and window trim (this may have been inspired by my personal desire to have all new windows installed with black trim on my own house.) And since it’s an ice cream shop, I obviously incorporated some color in other areas like the door and benches… more on that later.
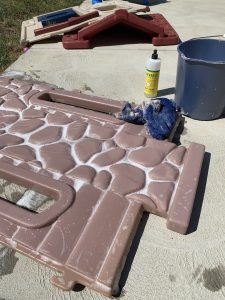
I started by spray painting the roof black and the whole rest of the house (siding and stones) white. I used Rust-Oleum brand paint that specifically states it bonds to plastic. They make little triggers that you use with your hand to protect your index fingers and my advice to you is BUY ONE (you can find them on Amazon.) I did not and it took days for my fingers to recover from the trauma of using one finger to push down on 12 cans of spray paint. DIY lesson learned!
Next, I hand-painted the stones with sponge brushes using three different shades of sample-sized gray paint that I scored on Marketplace for free. After they dried, I took a brush and dabbed other shades of gray and white on the stones to add some dimension and make them look more realistic. The final DIY step for the stones was to take the white paint and run through the “grout” areas between the stones with a small brush to clean it up a bit. Tedious? Yes. Worth it? Yes! It made it look so much cleaner.
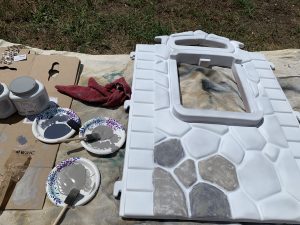
Next up was painting all the trim around the windows black which I did using a brush and a sample size can of black paint (I actually had to buy that one.) Then I had to do some touch ups with the white paint where I got black on the siding… then black paint where I got white on the trim during touch ups… you get the idea. I could have driven myself crazy just doing the touch ups. And even though it may have been overkill, I rolled on some white paint that I happened to have on hand onto the siding just to even things out and add another layer. And my son got to help with this part, too, which was fun to do together!
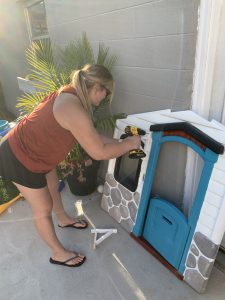
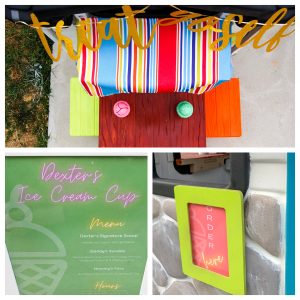
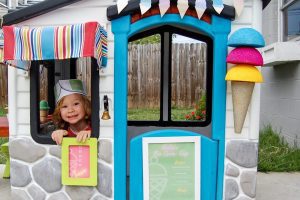
Now on to the color! An ice cream shop should be full of color, and I used an outdoor tablecloth I found on Amazon as my inspiration. I knew I wanted there to be an order window and a pickup window and each one would have an awning on top made from the tablecloth. Based on the awning colors, I settled on a blue door, orange and green benches, and green frames for the order and pick up signs. I incorporated other bright colors with the printed materials I made (more to come on that.) Lastly, I wanted the table to look like real wood and I achieved that by using a “Burnt Sienna” colored paint. I used spray paint on the benches and frames, and outdoor acrylic paint that I found at Michael’s on the door and table (using a roller and brushes for touch ups.) Once everything was painted, I hit the whole thing with a clear topcoat spray paint to protect it as much as possible.
After everything was completely dry, we put the house together and started working on decorating and accessorizing. I cut the aforementioned tablecloth into the appropriately sized pieces to make them into awnings, and I hemmed them with my sewing machine (okay, my mom did this; while I do have a sewing machine, I am just learning, so we let the expert handle this!) I drilled white shelf brackets onto either side of each window and super glued the awning to the brackets, using a staple gun to get them to drape the way I wanted them to.
Now was time to make a very important decision: what to name the shop! I let my son, Dexter, decide, and he named it “Dexter’s Ice Cream Cup”. I used the website Canva to design a logo, a menu, and the order/pick up signs for the windows. I made them all different colors to bring even more color into it. I laminated the signs (I happen to have a laminator but you could get this done at an office supply store) to keep them better protected from the elements. I made little stickers with the logo which I stuck onto paper soda jerk hats I found on Etsy. I made an ice cream cone garland with the printouts I used for our neighborhood ice cream stand, and found the “Treat Yoself” garland on Amazon.
As I was strolling through Michael’s, the cone and half-sphere shaped Styrofoam caught my eye and I knew I could make a fun accessory with it! I found craft spray paint meant to be used on things like Styrofoam (real spray paint will cause it to disintegrate) and painted each half-sphere to be a scoop of ice cream and stacked on top of the cone which I painted gold. I put a wooden skewer through it, then hot glued them all together. I drilled a couple of bolts next to the door to stuck it right on. The cone probably won’t last forever, but it is removable for when it rains, and most of the time it stays off until we start playing. And finally, my son’s very favorite part: the shopkeeper’s bell (found on Amazon!) The playhouse originally had a doorbell but it was missing when we bought it, and this little bell happened to fit right into the slot. I just drilled the bottom of it into the inside of the house to keep it in place.

There you have it! I wouldn’t call this an easy or inexpensive project. All in all it took me about six weeks, but as a full-time working mom, I had to fit in time to work on it whenever I could. It probably cost me at least $200-$250 in materials (including the cost of the house), so cheaper than buying a brand new one but not what I would consider inexpensive. You could definitely do a little less intense version for much cheaper. Regardless of how you approach it, I hope this gives you a little inspiration!


